Saturday, March 17, 2012

DIY How to Glaze Furniture - Tutorial


Glazing is such an awesome tool to have in your arsenal of DIY tricks, and it's so easy. The goal of glazing is to make your furniture, frames, nick-knacks, (whatever you want) look old and imperfect!

Here's what I'll be glazing today

Super cute lamp I was so lucky to have gotten from my Mom for free! It has been in her basement for years! It was in excellent condition, just a little dirty.

First, you'll want to wash and dry what you'll be glazing. If needed, prime and paint in your desired color. I just stuck with the white, but sprayed it again with Krylon Gloss White for a nice even finish. Here's my lamp taken apart and ready to be glazed

Baby Fi supervised the project along with Carl the caterpillar and Issac the sheep.

For the glaze I used Valspar's Clear mixing glaze, I found it in Lowes for $17. I like it because I can tint it whatever color I want. 


At Lowes they can tint a quart or gallon of glaze for you, or you can buy glaze that is already tinted.  I find having the clear allows me the freedom to make whatever color glaze I want. This quart goes a LONG way, so there's no reason to be stuck using only one shade on all my future projects.
For this lamp I wanted my glaze to be a brownish-black. So I mixed about 4 parts glaze to 1 part brown and black paint mixed together. This is a rough estimate, I did not measure it.


 Also keep in mind that when the glaze is wet it is going to appear slightly lighter than it is going to dry.

If you are using a different brand follow the manufacturers instructions for exact mixing terms, although it will probably be very similar

Latex paint is recommended to use for the tint, but I used acrylic craft paint because it is what I had on hand, and it worked just fine.

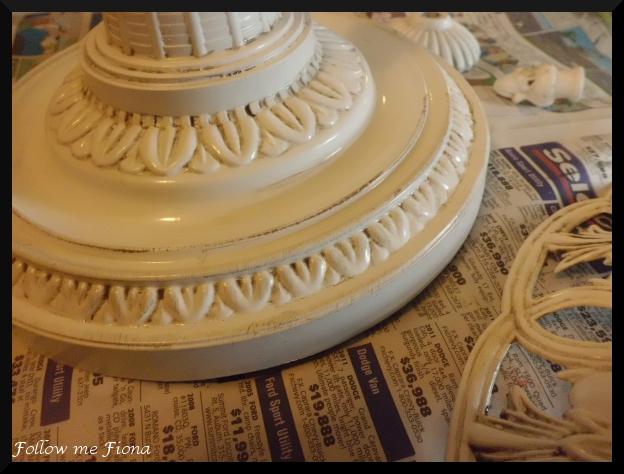
Here is the top of my lamp before I started glazing


Paint on your glaze using a regular brush. Get into the nooks and crannies you want highlighted the most

Wipe away the excess with a rag (or your husbands old (clean) sock - I swear its clean, it just looks gross lol)

Its very easy, but I made a short video to show you how I do it. I'm painting in one hand and holding the camera in the other, so the camera shakes a little, sorry :)


Yes that's Fiona cooing in the background

If you've wiped too much of your glaze off, simply go back and apply another coat. The glaze is slow drying, so you have lots of time to achieve your desired look.

After I've applied and wiped my glaze I like to go back over and "dry brush" 

Here I take a foam brush, $1 at Walmart, add a little glaze and then pat most of it off onto a rag.

Then I simply brush on where I want some added detail. This looks nice on raised edges where your rag probably wiped clean.
You can also dry brush wherever you want some light highlighting.

Here's my lamp all finished. If you wanted to add more dimension you could also give it a light sanding at this point, I left my lamp the way it is.

Here it is in the corner of my living room, next to the Xbox controller of course.

I hope this tutorial helps!

Friday, March 9, 2012

Thrift Store Frame Transformation

Today was SO amazingly nice out, (for Central New York in March that is) and Fiona took an awesome 45 minute nap this afternoon allowing me to work super quickly and revamp this frame! I picked up this frame a few weeks ago and it has just been sitting in a box waiting to be of use. I got the frame from.. you guessed it, Salvation Army. This time I paid a whopping $4.99. I really like the details on this bad boy


A couple of spots had some chipping, but I figured by the time I was done with it you wouldn't notice

I totally could have left it gold and it would have looked fine, but where's the fun in that! First I ripped off the backing to discover there were a million staples in it.

 Someone was seriously worried about keeping that pear in the frame.

There were so many staples, even after bending them all back, they just kept getting in the way of removing the glass. After many failed attempts at removing the glass without breaking it, I decided to just cover the glass in like 60 layers of newspaper.

Here it is primed, spray painted, and dried for a few hours. At this point I started having a serious dilemma of as to whether or not I should glaze the frame.


So I glazed half of it with brownish black glaze. (Valspar clear mixing glaze mixed with equal parts brown acrylic paint and black acrylic paint). I decided that I liked highlighting the details, plus I thought it would match the picture inside... but I'll get to that in a minute 


Close up of the details with the glaze, it really makes them pop.


I was doing this while these two slept on the couch (at 6:30pm I might add)
This picture is just too cute :)


Here's what I put inside! It's a sketch my sister made of Fiona, so adorable I just love it. Sorry I couldn't get the image to be clear without a glare. It was dark out when I took these pictures.. and my camera is not the greatest.

Here it is in the room. These walls look rather bare (and awkward) now that I am seeing them online!
I seriously have to do something about that very fake gold frame on the left. It does not match this room at all, perhaps I'll spray it a glossy black... some other day. 

What do you think? Have you revamped any thrifty finds lately?
 

Monday, March 5, 2012

Green Smoothie Recipe

     So today I'm posting my favorite way to start the day: a delicious healthy green smoothie! Okay.. so secretly definitely my favorite way to start the day is with cold pizza, but I feel much better when I start with a smoothie.
Starting your day with fruit is great for your body. Fruit is easily digested and quickly yields energy. Your body just went through a long resting period, you don't want to immediately bog it down with slow to digest sugars: carbs (think waffles, pancakes, english muffins, etc.) That being said, just a smoothie alone may not be enough to keep you full, I often start my day with a smoothie and then an hour later have a bowl of oatmeal.*  Here's the how to:


 First you'll want to gather your ingredients


While your gathering/measuring ingredients you'll need to slightly thaw out 1 cup of frozen fruit. Thaw them by placing them in hot water for a five minutes, or letting them stand at room temp for fifteen. You don't want them completely warm because they are the coldest ingredient and help give your smoothie a nice consistency; but, you don't want them frozen either or your blender won't properly break them down... unless you have a really good blender. Now, this mix bag of frozen fruit is great because it keeps forever in the freezer. Fresh fruit can absolutely be substituted, but then you might want to add frozen yogurt or ice to your smoothie.


Fresh fruit, use what you have on hand! If your fresh fruit is about to go bad, or is starting to get a couple of soft spots but is not yet rotting, use it in your smoothie. The texture of the fruit is gone once you blend it, making this a great way to use up fruit past its prime.


One cup of spinach. Don't be freaked out by the spinach! I promise, you will not taste it. You can use any leafy green here, kale would be a great nutrient dense option. I like to use spinach for the iron and calcium.


One and a half cups of milk. I love soymilk so I opted for it, but you can use whatever you like; dairy milk, almond milk, rice milk, etc.


Throw all your ingredients in a blender and pulverize it!

Action shot :-O

 
Delicious and healthy! I like the way it tastes sweetened only by the milk and fruit, but you may prefer to add some sugar. This recipe yields enough for two people, (so you might want to half it) but I like to drink it all and get in my fruits and veggies the easy way!

This is really just a guideline, this smoothie is totally customizable, try adding yogurt for a some creaminess. You can also freeze it in an icepop form and eat it on a warm summer day. I hope you make your own!


Fiona working on the blog with her sheep


*please note that I am not a doctor or dietician, and you probably should not take advice from me


Green Smoothie
1 C mixed frozen fruit
1 banana
1 C spinach
1.5 C milk

Slightly thaw frozen fruit
Break banana into pieces
Add all ingredients to blender
Blend until smooth

Sunday, March 4, 2012

DIY Remove sticker adhesive

     Hey guys! So today I'm going to show you how easy it is to remove stuck on adhesive from old stickers without the use of Goo Gone, or other commercial products.

First take your item with an icky old sticker on it and admire it in all of its sticky linty gloriousness.


I got this mirror from Salvation Army for $1.99 so its extra groody (groddy? groodie? does anyone actually use this word but me?) See the sticker remnants in the upper left hand corner?


Vegetable oil to the rescue! The most important thing to remember is you have to use very expensive, name brand, extra extra EXTRA virgin olive oil made for maintaining unicorn hair. This ensures that it is made with only the best and most exotic ingredients. Or you can use cheap-o Walmart brand oil like I did. 
(you can totally use any oil to break down the adhesive)


Put some oil on a paper towel, and apply a little (or a alot of) elbow grease. Once all the stickiness is gone, spray your glass or mirror with window cleaner and wipe clear with a paper towel.


All better! Isn't it amazing the wonders that a little vegetable oil and window cleaner can do for a dirty mirror and frame?


Last step: hang up your picture (or mirror in this case.. I carefully placed it so you can get a good view of my ceiling fan blade). I think I might eventually replace the mirror with a print or photo.
Sorry this photo is blurry/dark, taking photos is not one of my fortes.
See that cute print underneath the mirror? I found that at Salvation Army for $1.99 too, I love good deals!

Here's a picture of Fiona after eating some avocado to help you get through your day, don't you just love that little squishy face!
 
Here's to hoping someone is reading this asides from my mom!
Love you Mom!

Thursday, March 1, 2012

Dollar Store Faux Ceramic Birds Makeover

     My first ever blog post, this is so exciting! I want this blog to be a diary of me and my family and what we become. My husband and I are looking desperately for a nice home to raise our beautiful five month old baby girl in. As we've been scouring Central New York for a home that we love, I've been collecting projects and ideas for our future residence. This blog will journey us from finding the one simple MLS listing and taking it to the place where all our future memories will be made. Before we get there I'll share thrifty finds and crafts in the making, not to mention recipes! I cant let my degree in restaurant management go to waste..  :) Anyway, to the post!